
基于 TCC 写一个所谓的分布式事务#1
基本结构
什么是分布式事务,什么是 TCC 就不在阐述了,具体参考浅谈分布式事务 #1 和 #2。
TCC 框架下的分布式事务主要由 TxManager、TxStore、RegistryCenter、TCCComponent。
其中 TxManager 负责聚合 TxStore 和 RegistryCenter 并管理其生命周期,TxStore 和 TCCComponent 由业务侧自行实现,然后在 TxManager 中完成注册和注入。
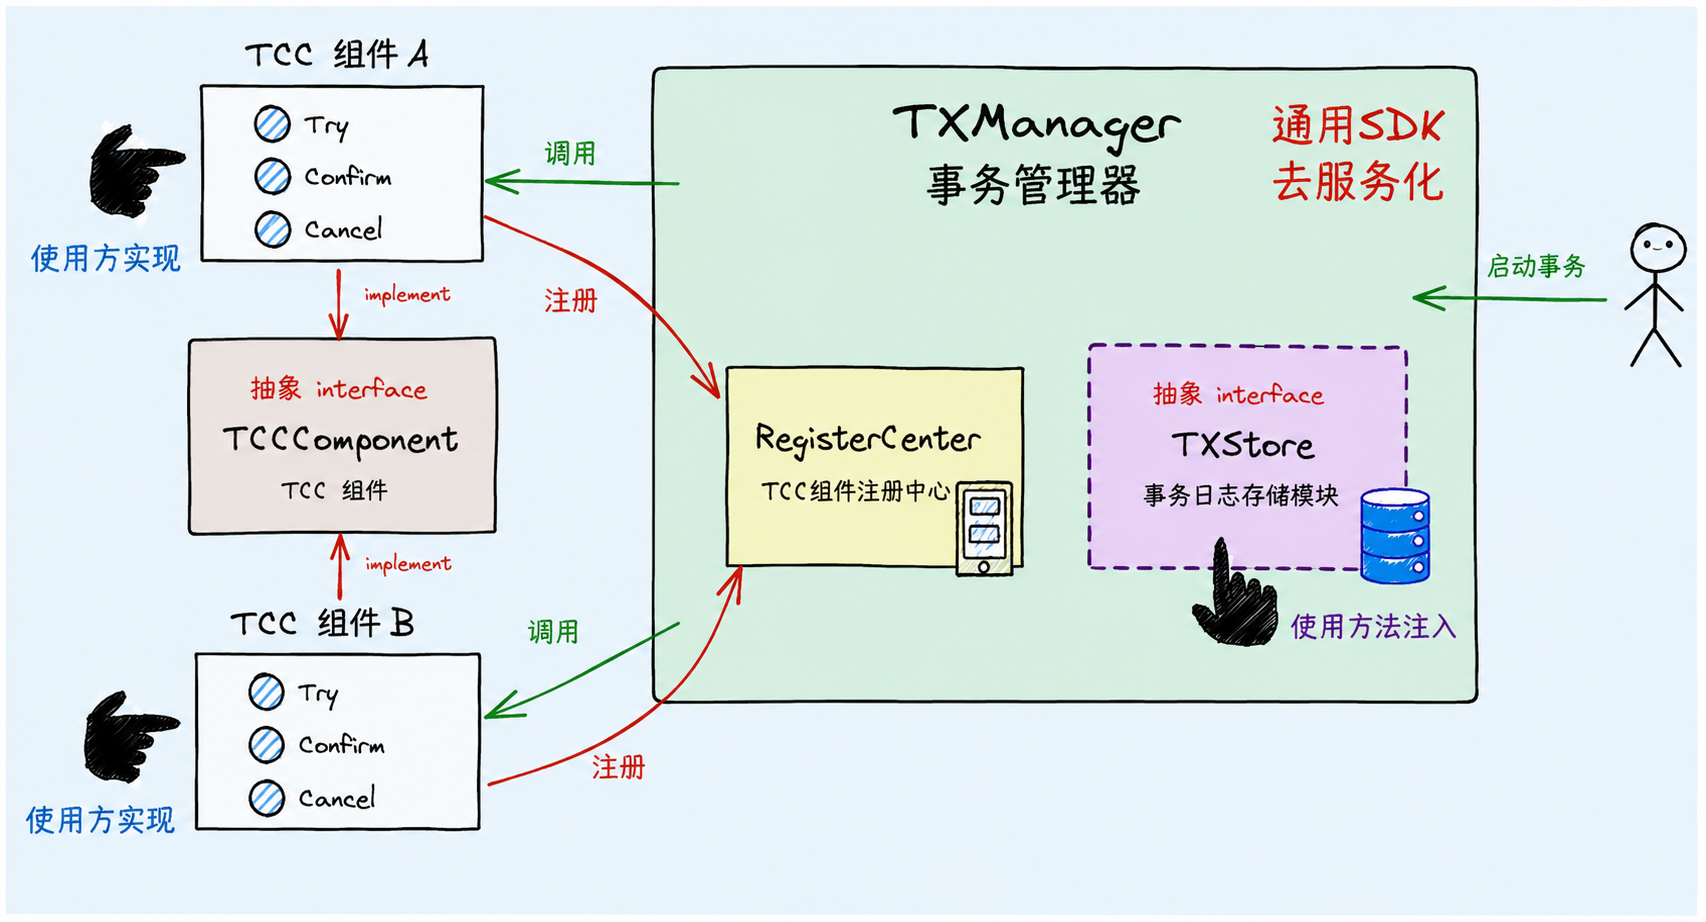
在实现 TCC 框架的实战环节中,首先需要明确的事情是:
- 哪部分内容在 TCC 架构中属于通用的流程,这部分内容可以抽取出来放在 SDK 中,以供后续复用;
- 哪部分内容需要给使用方预留出足够的自由度,由使用方自行实现,然后和通用 SDK 进行接轨。
这两个问题其实是开发 SDK 的通用问题。
- 在 TCC SDK 中实现的通用逻辑包含了和事务协调器 TxManager 有关的核心流程;
- 事务协调器 TxManager 开启事务以及 try-confirm/cancel 的 2PC 流程串联;
- 事务协调器 TxManager 异步轮询任务,用于推进事务从中间态走向终态;
- TCC 组件的注册流程:
- 需要预定义事务日志存储模块 TxStore 的实现规范(声明 interface);
- 需要预定义 TCC 组件 TCCComponent 的实现规范(声明 interface)。
- TCC 组件和 TxStore 两部分内容需要由使用方自行实现。
- 使用方自行实现 TCCComponent 类,包括其 Try、Confirm、Cancel 方法的执行逻辑;
- 使用方自行实现具体的 TxStore 日志存储模块. 可以根据实际需要,选型合适的存储组件和存储方式。
实现 TCC 框架
TCC 中最关键的组件就是 TxManager,下图清晰的描述了其结构关系:
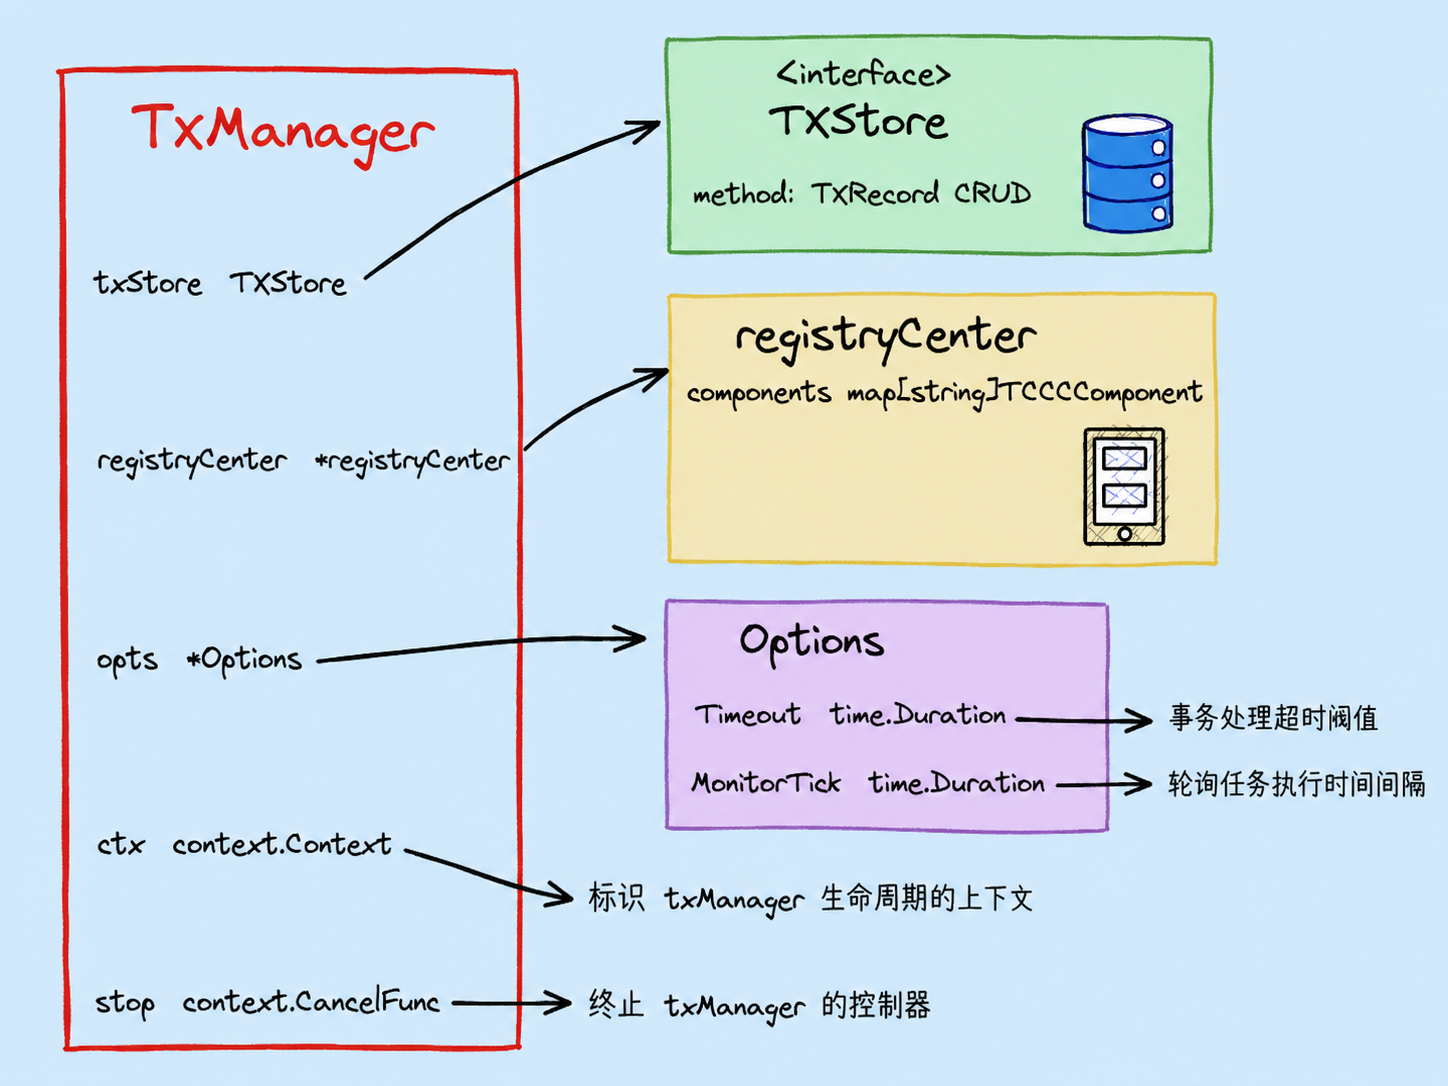
TxManager
type TXManager struct {
	ctx            context.Context
	stop           context.CancelFunc
	opts           *Options
	txStore        TXStore
	registryCenter *registryCenter
}
下面来一步步实现 TxManager 中的每一个方法。
对于初始化,我们依然采用函数选项模式进行配置注入,这在 SDK 的开发中十分常见:
type Options struct {
	// 事务执行时长限制
	Timeout time.Duration
	// 轮询监控任务间隔时长
	MonitorTick time.Duration
}

type Option func(*Options)

func WithTimeout(timeout time.Duration) Option {
	if timeout <= 0 {
		timeout = 5 * time.Second
	}

	return func(o *Options) {
		o.Timeout = timeout
	}
}

func WithMonitorTick(tick time.Duration) Option {
	if tick <= 0 {
		tick = 10 * time.Second
	}

	return func(o *Options) {
		o.MonitorTick = tick
	}
}
业务方需要首先实现 TxStore,并调用一系列的 WithXXX 函数进行配置注入,完成 TxManager 的初始化:
func NewTXManager(txStore TXStore, opts ...Option) *TXManager {
	ctx, cancel := context.WithCancel(context.Background())
	txManager := TXManager{
		opts:           &Options{},
		txStore:        txStore,
		registryCenter: newRegistryCenter(),
		ctx:            ctx,
		stop:           cancel,
	}

	// 配置注入
	for _, opt := range opts {
		opt(txManager.opts)
	}

	// 配置合法化
	repair(txManager.opts)

	go txManager.run()
	return &txManager
}

func (t *TXManager) Stop() {
	t.stop()
}
TxManager 如何打通整个链路我们先放一边,先将 TxManager 中所需的 Struct 分别完成定义。
RegistryCenter
虽然 TxManager 从命名来看像是在直接管理 TCC Component,其实不然,Component 其实是通过注册中心管理的,TxManager 是负责调度整个事务而非事务中所参与的 Component。
type registryCenter struct {
mux sync.RWMutex
components map[string]TCCComponent
}
func newRegistryCenter() *registryCenter {
return ®istryCenter{
components: make(map[string]TCCComponent),
}
}
注册中心写起来很简单,它仅仅负责外部 Component 的注册,所以只需要一个 Map 就足矣了,不过为了处理多线程问题,我们引入 RWMutex 来解决 Map 并发读写问题,当然也可以直接用 sync.Map,不过 sync.Map 可能难以处理组合逻辑的原子性。
func (r *registryCenter) register(component TCCComponent) error {
	r.mux.Lock()
	defer r.mux.Unlock()
	if _, ok := r.components[component.ID()]; ok {
		return errors.New("repeat component id")
	}
	r.components[component.ID()] = component
	return nil
}

// getComponents 用于上游 TxManager 获取 Component
func (r *registryCenter) getComponents(componentIDs ...string) ([]TCCComponent, error) {
	components := make([]TCCComponent, 0, len(componentIDs))

	r.mux.RLock()
	defer r.mux.RUnlock()

	for _, componentID := range componentIDs {
		component, ok := r.components[componentID]
		if !ok {
			return nil, fmt.Errorf("component id: %s not existed", componentID)
		}
		components = append(components, component)
	}

	return components, nil
}
然后在 TxManager 中加入 Register 方法:
func (t *TXManager) Register(component component.TCCComponent) error {
    return t.registryCenter.register(component)
}
TxStore
TxStore 是用于存储 TCC 日志,此处使用 interface 声明,由业务侧实现所有方法。
// 事务日志存储模块
type TXStore interface {
	// 创建一条事务明细记录
	CreateTX(ctx context.Context, components ...TCCComponent) (txID string, err error)
	// 更新事务进度:实际更新的是每个组件的 try 请求响应结果
	TXUpdate(ctx context.Context, txID string, componentID string, accept bool) error
	// 提交事务的最终状态, 标识事务执行结果为成功或失败
	TXSubmit(ctx context.Context, txID string, success bool) error
	// 获取到所有未完成的事务
	GetHangingTXs(ctx context.Context) ([]*Transaction, error)
	// 获取指定的一笔事务
	GetTX(ctx context.Context, txID string) (*Transaction, error)
	// 锁住整个 TXStore 模块(要求为分布式锁)
	Lock(ctx context.Context, expireDuration time.Duration) error
	// 解锁TXStore 模块
	Unlock(ctx context.Context) error
}
实现事务主链路
TCC 框架下的事务链路可以简单描述为:
Transaction(启动事务) -> GetTCCComponents(获取 TCC 组件) -> CreateTx(创建事务) -> TwoPhaseCommit(进入 2PC 链路)
要启动事务,我们首先要明确要启动什么事务?TCC 组件调用参数分别是什么?
type RequestEntity struct {
	// 组件名称
	ComponentID string `json:"componentName"`
	// 组件入参
	Request map[string]interface{} `json:"request"`
}
我们将 RequestEntity 结构体作为启动事务的关键参数:
// Transaction 事务
func (t *TXManager) Transaction(ctx context.Context, reqs ...*RequestEntity) (string, bool, error) {
	tCtx, cancel := context.WithTimeout(ctx, t.opts.Timeout)
	defer cancel()

	// 获得所有的组件
	componentEntities, err := t.getComponents(tCtx, reqs...)
	if err != nil {
		return "", false, err
	}

	// 先创建事务明细记录,并取得全局唯一的事务 id
	txID, err := t.txStore.CreateTX(tCtx, componentEntities.ToComponents()...)
	if err != nil {
		return "", false, err
	}

	// 两阶段提交, try-confirm/cancel
	return txID, t.twoPhaseCommit(ctx, txID, componentEntities), nil
}
2PC
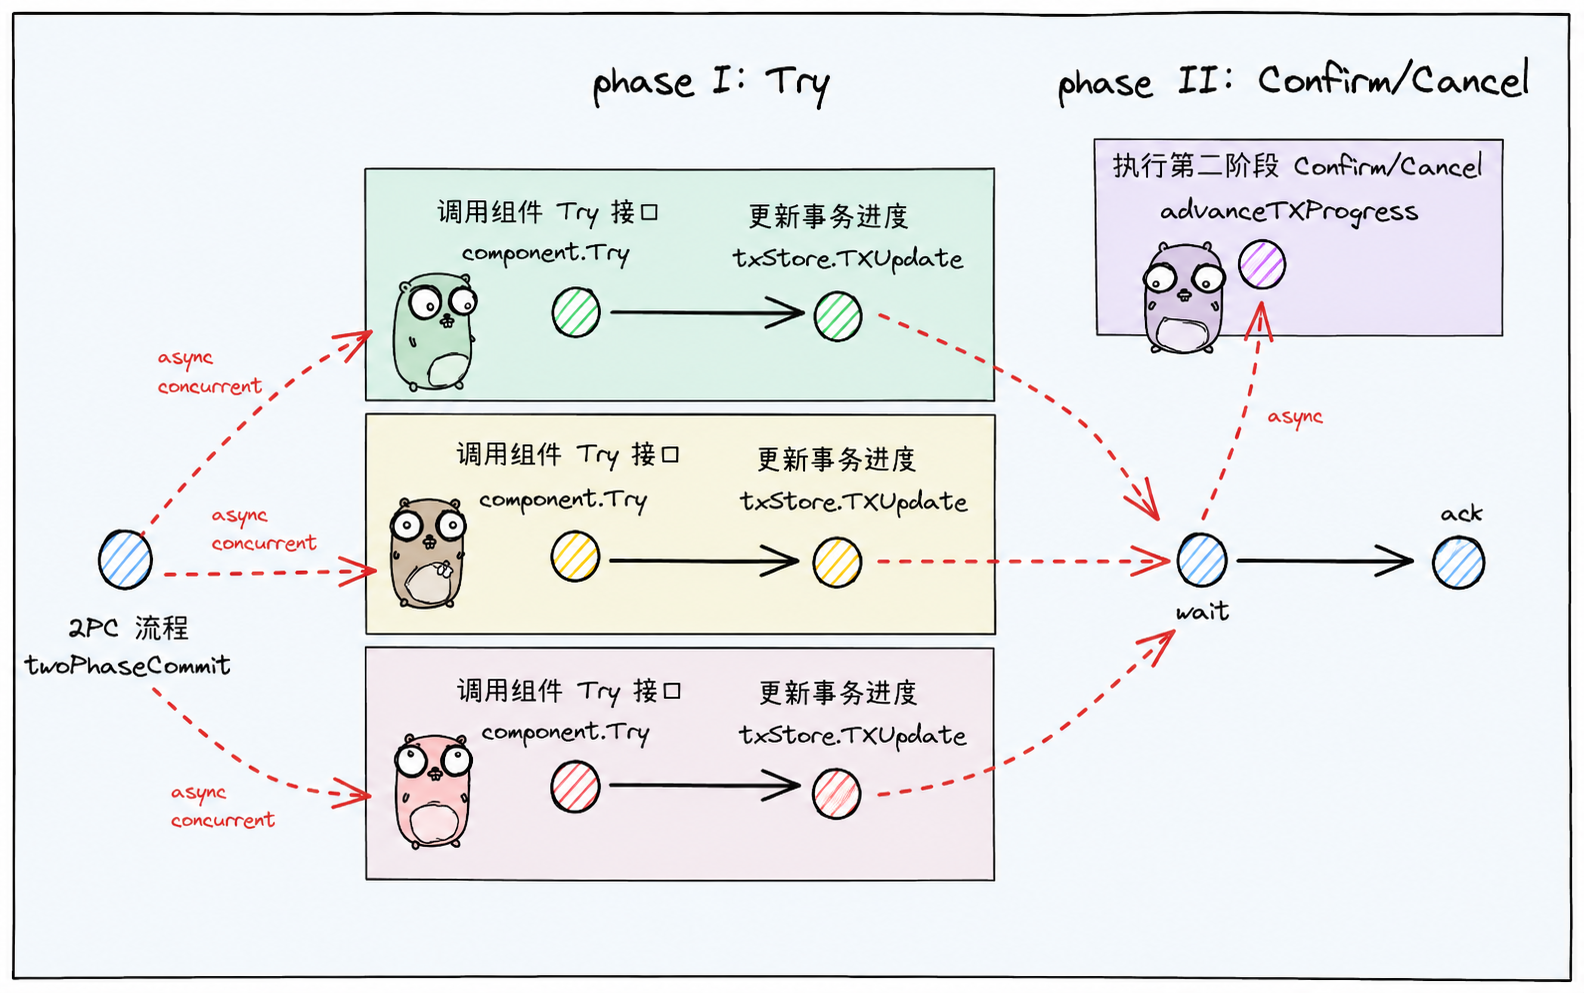
2PC 即两阶段提交,是 TCC 中的精髓,之所以被称为 2PC,看图就能明白,要完成一个事务的提交,需要经历两个主要步骤,第一是分别异步调用该事务中所有 Components 的 Try 方法,等待分别返回结果,根据收集到的 Try 方法的结果,决定第二次 Commit 的流转链路,但凡有一个 Try 方法失败,那么 TxManager 会分别调用所有 Components 的 Cancel 方法完成事务回滚。
// twoPhaseCommit 2PC
func (t *TXManager) twoPhaseCommit(ctx context.Context, txID string, componentEntities ComponentEntities) bool {
	cCtx, cancel := context.WithCancel(ctx)
	defer cancel()

	// 并发执行,只要中间某次出现了失败,直接终止流程进行 cancel
	// 如果全量执行成功,则批量执行 confirm,然后返回成功的 ACK
	errCh := make(chan error, len(componentEntities))

	// 异步处理与等待
	go func() {
		// 并发处理多个 component 的 try 流程
		var wg sync.WaitGroup
		for _, componentEntity := range componentEntities {
			// shadowing 解决 range 循环变量迭代复用导致的 goroutine 或闭包错误地捕获同一个 componentEntity
			// >= go 1.22 range 每次迭代都会创建新变量,不必再 shadowing
			componentEntity := componentEntity

			wg.Add(1)
			go func() {
				defer wg.Done()
				resp, err := componentEntity.Component.Try(cCtx, &TCCReq{
					ComponentID: componentEntity.Component.ID(),
					TXID:        txID,
					Data:        componentEntity.Request,
				})
				// 但凡有一个 component try 报错或者拒绝,需要进行 cancel,但会放在 advanceProgressByTXID 流程处理
				if err != nil || !resp.ACK {
					log.ErrorContextf(cCtx, "tx try failed, tx id: %s, comonent id: %s, err: %v", txID, componentEntity.Component.ID(), err)
					// 对对应的事务进行更新
					if _err := t.txStore.TXUpdate(cCtx, txID, componentEntity.Component.ID(), false); _err != nil {
						log.ErrorContextf(cCtx, "tx updated failed, tx id: %s, component id: %s, err: %v", txID, componentEntity.Component.ID(), _err)
					}
					errCh <- fmt.Errorf("component: %s try failed", componentEntity.Component.ID())
					return
				}
				// try 请求成功,但是请求结果更新到事务日志失败时,也需要视为处理失败
				if err = t.txStore.TXUpdate(cCtx, txID, componentEntity.Component.ID(), true); err != nil {
					log.ErrorContextf(cCtx, "tx updated failed, tx id: %s, component id: %s, err: %v", txID, componentEntity.Component.ID(), err)
					errCh <- err
				}
			}()
		}

		wg.Wait()
		close(errCh)
	}()

	successful := true
	if err := <-errCh; err != nil {
		// 只要有 try 请求出现问题,其他的都进行终止
		cancel()
		successful = false
	}

	// 执行二阶段. 即便第二阶段执行失败也无妨,可以通过轮询任务进行兜底处理
	if err := t.advanceProgressByTXID(txID); err != nil {
		log.ErrorContextf(ctx, "advance tx progress fail, txid: %s, err: %v", txID, err)
	}
	return successful
}
进度推进
注意到 2PC 还对一个关键方法进行了调用 t.advanceProgressByTXID(txID) 来根据 Try 的结果推进当前事务的进度:
// advanceProgressByTXID 传入一个事务 id 推进其进度
func (t *TXManager) advanceProgressByTXID(txID string) error {
	// 获取事务日志记录
	tx, err := t.txStore.GetTX(t.ctx, txID)
	if err != nil {
		return err
	}
	return t.advanceProgress(tx)
}

// advanceProgress 传入一个事务 id 推进其进度
func (t *TXManager) advanceProgress(tx *Transaction) error {
	// 根据各个 component try 请求的情况,推断出事务当前的状态
	// 注意这里还计算了超时,太久没有拿到结果的 try 请求也会算做失败
	txStatus := tx.getStatus(time.Now().Add(-t.opts.Timeout))

	// hanging 状态的暂时不处理,等待处理完成
	if txStatus == TXHanging {
		return nil
	}

	success := txStatus == TXSuccessful
	// 根据事务是否成功,定义不同的处理函数
	var confirmOrCancel func(ctx context.Context, component TCCComponent) (*TCCResp, error)
	var txAdvanceProgress func(ctx context.Context) error

	if success {
		confirmOrCancel = func(ctx context.Context, component TCCComponent) (*TCCResp, error) {
			// 对 component 进行第二阶段的 confirm 操作
			return component.Confirm(ctx, tx.TXID)
		}
		txAdvanceProgress = func(ctx context.Context) error {
			// 更新事务日志记录的状态为成功
			return t.txStore.TXSubmit(ctx, tx.TXID, true)
		}

	} else {
		confirmOrCancel = func(ctx context.Context, component TCCComponent) (*TCCResp, error) {
			// 对 component 进行第二阶段的 cancel 操作
			return component.Cancel(ctx, tx.TXID)
		}

		txAdvanceProgress = func(ctx context.Context) error {
			// 更新事务日志记录的状态为失败
			return t.txStore.TXSubmit(ctx, tx.TXID, false)
		}
	}

	// 需要遍历处理所有 TCC 组件
	for _, component := range tx.Components {
		components, err := t.registryCenter.getComponents(component.ComponentID)
		if err != nil || len(components) == 0 {
			return errors.New("get tcc component failed")
		}
		// 执行二阶段的 confirm 或者 cancel 操作
		resp, err := confirmOrCancel(t.ctx, components[0])
		if err != nil {
			return err
		}
		if !resp.ACK {
			return fmt.Errorf("component: %s ack failed", component.ComponentID)
		}
	}

	// 二阶段操作都执行完成后,对事务状态进行提交
	return txAdvanceProgress(t.ctx)
}
轮询机制
倘若存在事务已经完成第一阶段 Try 操作的执行,但是第二阶段没执行成功,则需要由异步轮询流程进行兜底处理,为事务补齐第二阶段的操作,并将事务状态更新为终态,以增强 TxManager 的鲁棒性。
轮询的时间间隔会根据一轮任务处理过程中是否出现错误,而进行动态调整。
这里调整规则是:当一次处理流程中发生了错误,就需要调大当前节点轮询的时间间隔,让其他节点的异步轮询任务得到更大的执行机会。
在之前给出的 NewTXManager 函数中使用 goroutine 启动了 run 方法:
// backOffTick 指数退避
func (t *TXManager) backOffTick(tick time.Duration) time.Duration {
	tick <<= 1
	// 最大不超过 MonitorTick 的 2^3
	if threshold := t.opts.MonitorTick << 3; tick > threshold {
		return threshold
	}
	return tick
}

// run 轮询流程
func (t *TXManager) run() {
	var tick time.Duration
	var err error
	for {
		// 如果出现了失败,tick 需要避让,遵循退避策略增大 tick 间隔时长
		if err == nil {
			tick = t.opts.MonitorTick
		} else {
			tick = t.backOffTick(tick)
		}
		select {
		case <-t.ctx.Done():
			return

		case <-time.After(tick):
			// 加锁,避免多个分布式多个节点的监控任务重复执行
			if err = t.txStore.Lock(t.ctx, t.opts.MonitorTick); err != nil {
				// 取锁失败时(大概率被其他节点占有),不对 tick 进行退避升级
				err = nil
				continue
			}

			// 获取仍然处于 hanging 状态的事务
			var txs []*Transaction
			if txs, err = t.txStore.GetHangingTXs(t.ctx); err != nil {
				_ = t.txStore.Unlock(t.ctx)
				continue
			}

			err = t.batchAdvanceProgress(txs)
			_ = t.txStore.Unlock(t.ctx)
		}
	}
}

// batchAdvanceProgress 推进事务状态
func (t *TXManager) batchAdvanceProgress(txs []*Transaction) error {
	// 对每笔事务进行状态推进
	errCh := make(chan error)
	go func() {
		// 并发执行,推进各事务的进度
		var wg sync.WaitGroup
		for _, tx := range txs {
			// shadowing
			tx := tx
			wg.Add(1)
			go func() {
				defer wg.Done()
				// 每个 goroutine 负责处理一笔事务
				if err := t.advanceProgress(tx); err != nil {
					// 遇到错误则投递到 errCh
					errCh <- err
				}
			}()
		}
		wg.Wait()
		close(errCh)
	}()

	var firstErr error
	// 通过 chan 阻塞在这里,直到所有 goroutine 执行完成,chan 被 close 才能往下
	for err := range errCh {
		// 记录遇到的第一个错误
		if firstErr != nil {
			continue
		}
		firstErr = err
	}

	return firstErr
}
TCC 业务侧实现
很遗憾,这是一个很大的板块,我不能继续在该文章区拉 💩 了!
要使用 TCC 其实是很麻烦的,看似架构清晰,实际上来说,业务侧要做的事情非常多,比如需要针对事务操作封装 TCC Component,还需要实现 TxStore,实现分布式锁等。这是一个庞大的工程,就留到下一篇了!垮台!
评论区